Recipe: Homemade Gluten Free Bread

by Carrie

in Baked Goods

Now for the Recipe…

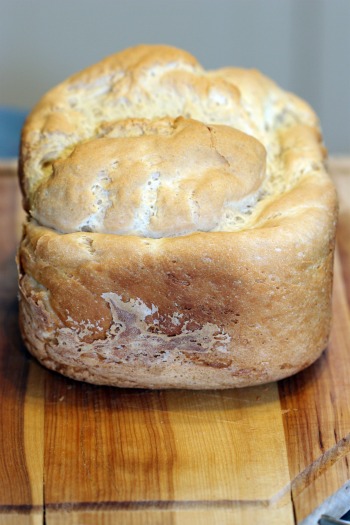
Here is a recipe for gluten free bread. I was able to make this bread using my bread machine, which meant eating homemade bread in a relative short period of time.

This bread had a crispy crust and was light and soft. Again, not something you get from the frozen loafs of bread you buy in the grocery store.

The key to making a good gluten free loaf of bread in a bread machine is to mix all the ingredients in a kitchen aid mixer first. Gluten free flours need a lot of mixing to incorporate them, and bread machines do not have enough power to do that.

This recipe is not my own but was handed to me by a customer at work. No name was attached so I take no credit for the recipe, but also am not able to give credit to the original author.

Recipe: Homemade Gluten Free Bread

1 cup + 2 Tbsp tapioca starch
¾ cup brown rice flour
¾ cup potato starch
2 tsp xanthan gum
¾ tsp salt
1 Tbsp sugar
2 tsp instant yeast
1 egg + 1 egg white
¾ tsp cider vinegar
1 ½ tsp canola oil
1 1/3 cup milk(warmed)

Measure and mix dry ingredients.

Beat eggs. Add them, along with milk, oil and vinegar to dry ingredients.
Mix thoroughly in a stand mixer to fully incorporate all ingredients.

Add dough to bread machine.
Set bread machine to gluten free setting, 1 ½ lb loaf size and dark crust.

Let bread cool on its side before cutting.

Enjoy!

Never Miss Another Recipe!

I take your privacy very seriously

{ 65 comments… read them below or add one }

Anat October 12, 2012 at 3:31 pm

Hi,
I have just baked the bread. It is delicious but not brown enough. I think that next time I’ll use a a different program on my bread maker. I did it once with a different bread and it worked wonderfully.
I also want to say that I used soy milk instead of milk and it is still great.
Thanks for sharing with us your recipes.

Jen October 21, 2012 at 8:33 pm

I was wondering if you had steps/ suggestions to make this without a bread machine? Looks good!

sharon October 27, 2012 at 2:49 pm

Can this be made without using a bread machine

Marie November 11, 2012 at 5:55 pm

I just made a loaf of this bread and it turned out quite nicely. I think it may have fallen as the loaf is quite small but it tastes great is isn’t gooey or hard. The crust is crunchy and the middle is soft. My husband love it! I don’t have a gf setting on my bread machine so I used rapid bake setting. Thanks for the recipe!

Esther December 13, 2012 at 3:13 pm

I’ve made this a couple times without a breadmaker – I just mix the wet and dry ingredients together, put the wet dough into a greased loaf pan and let it rise (about 1.5 hours is about double in size), then bake it at 350F for about an hour (till it tests done). Hope this helps! :)

Aaron December 19, 2012 at 5:55 am

Here is how I tweaked the recipe to not include a bread machine, it worked out great!

1 ¾ cup Gluten Free Baking Flour Mix (see attached note that I wrote below)
¾ cup brown rice flour

¾ tsp salt

1 Tbsp sugar

2 tsp instant yeast

1 egg + 1 egg white

¾ tsp cider vinegar

1 ½ tsp canola oil

1 cup of milk (warmed)
1/3 cup of water (warmed)

** Baking Flour Mix – I purchased this product at a local grocery store called Food Basics, it is part of the A&P and Metro grocery chain, I am sure you can find something similar at your local store.
This was my first time using this product, I noticed that it already had many of the ingredients (i.e. Tapioca starch, xanthan gum) that many of the other recipes called for, I was assuming that I could use it cup for cup in exchange for flour

1. Mix all dry ingredients, except YEAST

2. Combine your yeast with the warm water in a bowl, mix it for about 30 seconds with a hand mixer until it starts to “foam”. Let sit aside for a few minutes

3. Combine the liquid ingredients together and add them to the dry mixture.

4. Add the yeast and water to the rest of the ingredients

5. Mix with a Kitchen-Aid mixer if you have it with a dough hook, (I used a hand mixer with a dough hook for my loaf)

6. Mix until you remove all lumps and make the mix smooth, it will have the consistency of a very thick pancake mix

7. Put into greased bread pan (I had to use a spatula and pour as it’s not a typical dough consistency)

8. Turn on your oven to the lowest possible setting for about 3 minutes, just to warm it up.

9. TURN OFF YOUR OVEN

10. Let dough rise in warm oven for about 1 hour with a dry tea towel over top of the bread pan

11. Once dough has doubled in size, bake at 375F for 20-25 minutes, until dark, golden brown

*Note: My dough only rose to the top of the bread pan, it wouldn’t go up and over like a typical wheat loaf will. It was flat on top.

Carrie December 21, 2012 at 8:27 pm

I have seen all the comments regarding gluten free bread and have been working for months on trying tons of different recipes for my followers. I’ve discovered some great recipes from various gfree authors and will be posting these cookbooks and recommendations in the next week. I appreciate everyones patience but Ive been playing and playing so that I can share great gfree bread with you all

Leslie January 19, 2013 at 5:13 pm

Hello, this is my 2nd time making your bread (but 3rd time making a loaf). The 1st time we had our Breadman machine mix it and took it out at 45 min early only because the very first loaf we made (different recipe) the crust was really dark but the inside was fine. So when we made our first loaf with your recipe the first time we thought to take it out early so the crust would be perfect. And it was! But the very center was still a little gooey, maybe a half dollar in size.

Now attempting the 2nd loaf with your recipe. This time we mixed it in our KitchenAide mixer then poured it into the breadmaker’s pan. We were going to take it out with 30 minutes left (rather than the 45min like before) but opted to leave it in for the full 3 hours. The 3 hours is a GF preset on our Breadmaker machine, so we can’t change anything on it. However this time, although the crust came out good it seemed like the whole inside was still sticky but not as gooey as the first attempt with your recipe.

Oh, probably thinking if we followed the recipe? We have followed each recipe to the ‘T’ with the exception of how it was mixed. This last time using the stand up mixer seem to have mixed everything better than what the breadmaker did with the first two loaves.

So, we have some questions and hope that you or anyone else have some ideas, we’d appreciate it.

Is there any ingredient that we can change, add, take out, substitute that would otherwise mitigate having a tacky center after cooking for 3hours?

We’ve read great reviews about the breadmakers, especially the one we invested in from Breadman. But is it just better to do it in the oven?

Any ideas on how we can keep the loaf from falling after it cools? Even if these loaves came out good, they would be too skinny for most cold cuts and cheeses for sandwiches. Thoughts?

We’ve read the best time to start slicing is after it has cooled for 15min, but the bread just seems to be soft and crushes thus spoiingl the enjoyment of having a nice warm slice. Any suggestions? We have a pretty sharp knife, too. But is there a recommended knife that we should invest in?

When we make your recipe it only rises to about half of the 2 lbs pan. The Breadman machine and other websites show loaves like those we buy in the stores to be rising nearly to the top of the 2 lbs pan, but ours doesn’t. So should we double our ingredients? But, if we do, and we’re having tackiness with the loaves now, I’m afraid we’ll really have a tacky loaf on doubling the recipe. But, as stated in my second question above the loaves are too small to put cold cuts on.

We look forward to anyone’s input.

Christine January 19, 2013 at 11:52 pm

Hi there,

I make this bread once every three days or so and I have only ever baked it in the oven. Mine turns out perfectly 9 times out of 10. I bake it in a ceramic loaf pan and bake it for 50 minutes instead of the original 40. There was the odd time that my loaf sank but I believe its because I was not ensuring the dough was spread out evenly in the pan and when it bakes the top rises quite high and if the top is off-center the weight can make it sink.
On the subject of the bread rising, mine has never risen very far during the 20 minute rising time but after it is in the oven it skyrockets…
That is my experience with the bread and the bonus of doing it with the kitchenaid and the oven is it takes less time to bake…10 minutes prep, 20 minutes rise and 50 minutes to bake, half the time of a breadmaker…
Hope this helps!

janine February 8, 2013 at 5:11 pm

I don’t have a gluten free setting on my bread machine, dd you have any recommendations as to what setting I should use?
Thanks!

dartmuffin February 23, 2013 at 8:36 am

I’m new to gluten free, so maybe my questions are basic… but I don’t know the answers, so I’ll ask anyway. Half of my family is gluten free, the others still eat “regular” bread. Is this a recipe that all of us would find acceptable? Or is gluten free bread generally less appealing? We’ve been trying different frozen breads, and they’re good toasted, but not so good fresh out of the bag.

As for your recipe… I don’t have a mixer. I do have a bread machine that has a gluten free setting. Is there a reason that I can’t let the bread machine mix the ingredients for me? And why do we leave the loaf on it’s side to cool? Is that something that you’ve noticed works for this loaf or all loaves in general?

Again, sorry if these are nuisance questions, but my son and I are dying for a good sandwich! :)

Christine February 23, 2013 at 10:21 am

Hi Dartmuffin,
I myself am not gluten free but I make this bread for my neighbour who is…I am picky about bread and find this recipe very delicious!
The reason you must use a mixer to mix the dough is because GF dough needs heavy blending and the bread machines don’t have enough power to do it.
You cool the loaf on its side to help prevent it from sinking….the loaf rises quite high when baked and the weight on the top can sink the loaf.
It is an amazing recipe and I suggest you try it and see….it you have a hand mixer I’m sure that will work as well but make sure you use it at full power.
Good luck to you!
Cheers!

best bread maker April 17, 2013 at 9:26 pm

Hi would you mind letting me know which webhost you’re utilizing? I’ve loaded your web in 3 different web browsers
and I will say this website loads a lot faster then others.
Can you suggest a good web hosting company at a fair price?
Cheers, I appreciate it! Please also excuse if my english
is not good.

Nadine May 2, 2013 at 7:46 am

Hi, I just mixed a batch. My 2.5 year old son helped me measure the ingredients. I just put in my gold star bread maker on control dark and basic bread. There were no comments here or in my manual on what program to select. I will keep you posted in 3.5 hours!!

insurance agent May 22, 2013 at 9:32 pm

Genuinely when someone doesn’t know afterward its up to other viewers that they will assist, so here it takes place.

Leave a Comment

{ 1 trackback }

Previous post:

Next post: